
Every CS2 player has their own quirks and unique settings, from custom key binds to unconventional video configurations. Manually adjusting these every time can be tedious. However, using config files, you can automate the process effortlessly. Here’s how to create a CFG file and set up an autoexec function in CS2.

A CS2 autoxec is a config file (CFG) is a set of commands that get “automatically executed” upon startup. It eliminates the need for manually configuring and tweaking every single setting that typically gets reset when the game is closed.
Most players use it to customize their crosshair, ViewModel settings, binds, HUD, and resolutions. However, you can pretty much add any setting/command you like, and it should still work once you launch CS2.
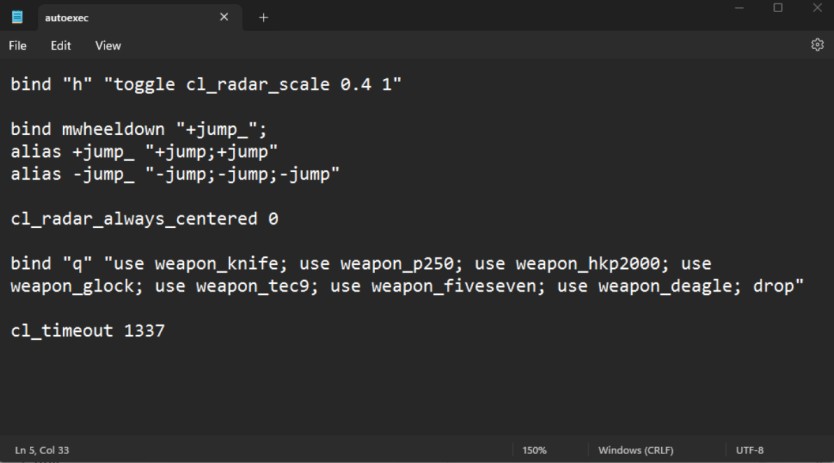
While creating a config file can seem intimidating, it’s actually made just using the built-in Windows notepad app.
Now, it’s time to move the autoexec file to the CS2 install location.
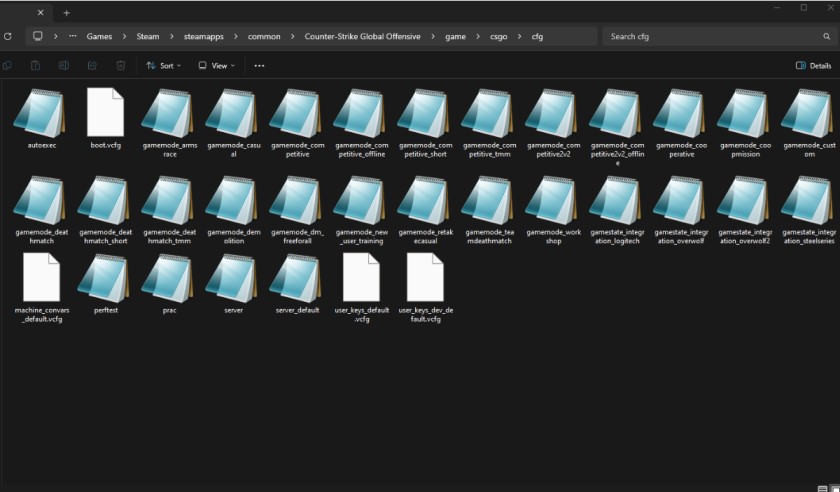
Despite already being in the CFG folder, it won’t automatically launch by itself. For this, you’ll need to:
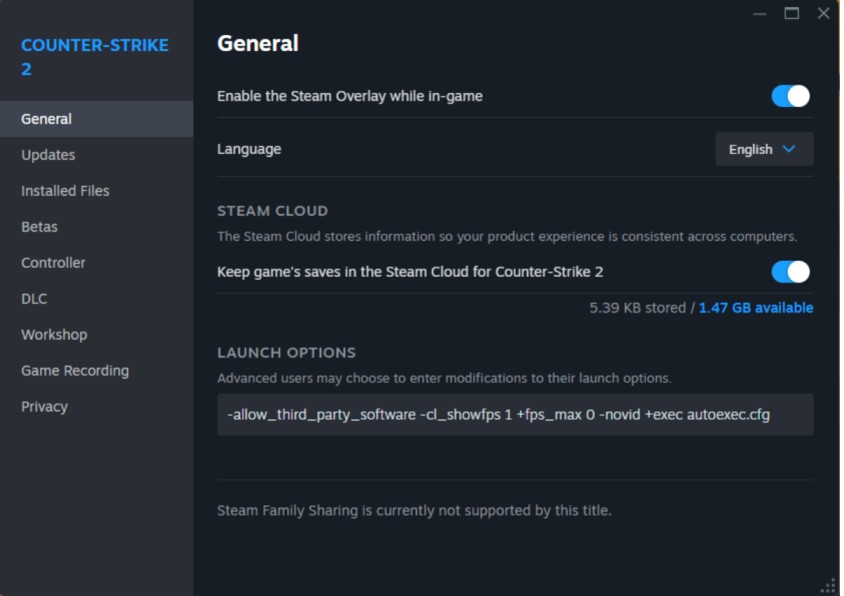
There you have it, all of the commands you included in your autoexec file should automatically be applied whenever you open CS2.
One of the biggest advantages of config files is their flexibility. They allow players to instantly apply their preferred settings, even when switching between different computers or setups. Plus, you’re not limited to just your own setup. You can simply download and use config files from other players. In fact, if you wanted to, you could grab s1mple’s CFG file and use it as your own.
To do that, you’ll need to:
Note: If you don’t want to use the CFG file as an autoexec, simply leave it in the same folder, then launch CS2. Once in a game, open the console, type in “exec *name*” and press Enter to launch.
Since the config file is made using Notepad or any text editor, we can also use the same applications to customize it. All you have to do is double-click on any CFG file and rewrite, add, or delete any of the commands to your liking. It’s that simple.
Just remember to replace the Steam CS2 Launch Options command if you change the name of an autoexec!

Good CS2 gameplay is influenced by various aspects, including your experience as a player, your gear, your teammates, and your crosshair. If you want to aim correctly and annihilate your opponents, you’ll need a crosshair that does the trick. However, if you’re new to CS2 and still learning about the game, perhaps you don’t know the best CS:GO crosshair codes. The best way to find a suitable option is by choosing a code used by pro players. In this post, we will take a look at some of these choices and explain how you can import these codes to CS2.
One of the most popular loyalty features on the platform is the KeyDrop Daily Case, which gives users the opportunity to obtain skins, gold, or account balance every day without making a direct purchase. But the system is controlled by particular XP levels, cooldown timers, and verification procedures; it's not just a "click and win" button.
This guide covers how the Daily Case system operates, why your case could be locked, and how to get the most out of your prizes as you advance through the KeyDrop levels.


![How to Deposit Money or Skins into CSGORoll ([year])](/imgs/news_8218/20250602/cache/1748864443_a25e3ae72a35709014f6___308_174.jpg "How to Deposit Money or Skins into CSGORoll ([year])")
![KeyDrop Daily Case Guide - How to Unlock Your Free Case ([year])](/imgs/news_8549/20260128/cache/1769592213_704b6fffed8bedabca2e___308_174.jpg "KeyDrop Daily Case Guide - How to Unlock Your Free Case ([year])")