How to make your own CS:GO server for free

What's inside
Unofficial CS:GO servers are servers with various modifications created by ordinary people. It can be used for training or entertainment. There are different types of privileges on these servers that users can buy. That is the primary income of server owners. Our team and friends have huge experience creating such servers, and we did it ourselves. If you don't understand any of this, don't worry. We will help even the most inexperienced beginner with this and show you how to make your server for free.
Technical requirements for CS:GO server
The only resource that we will use is your computer components. Although the server is a thing with a great appetite - you can create your full-fledged server with the average characteristics of your iron companion:
- 2 cores
- Intel or AMD CPUs with 2 GHz
- 2 GB RAM
- 15 to 20 GB of hard disk space
- SteamCMD software (recommended)
How do I setup a CS:GO server?
Any server has the same core - the base of a standard CS:GO server. That is a set of standard settings, plugins, and files that will be located on your computer. These files are the heart of your server:
Step 1 - Create a folder on your desktop called “Server”;
Step 2 - On this site you need to install SteamCMD and replace it in your “Server” folder;
Step 3 - Open SteamSMD (it will install all updates and file settings for your server);
Step 4 - Type “login anonymous”;
Step 5 - Type “app_update 740 validate” the same way;
Step 6 - Type “Quit”
Congratulations, you have installed server core on tour computer
Create token for your CS:GO server
Token - an electronic key to access your server. This is how you can generate it:
Step 1 - Find CS:GO on Steam;
Step 2 - Copy your personal number that you can find in URL;
Step 3 - login to your Steam Account and enter personal number that you’ve copied before;
Step 4 - in “Memo” section, you need to type the name of your future server (it will help you to track this token);
Step 5 - Click on “Create” button
Creating Server.cfg
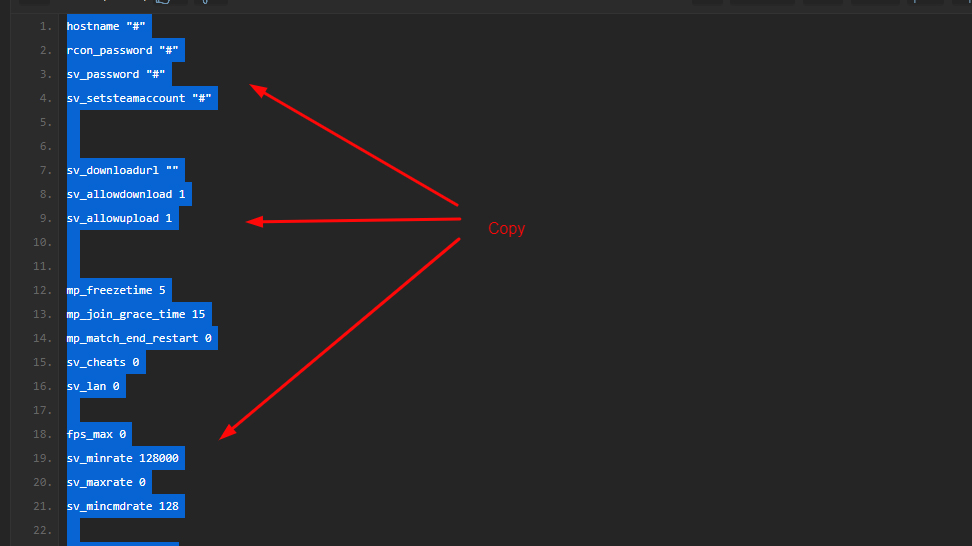
This is the file that will contain all the server settings. You can edit absolutely everything in this file, but we will help you make the standard settings. Go here and copy all settings below on screen.

- @Hostname “Name of the server”
- @rcon_password “Password to control game server”
- @sv_password “Login password”
- @sv_setsteamaccount “Your Token”
- Create .txt file and paste here all you’ve copied already
- Save this file as server.cfg and replace it with your server folder
These are the default settings for the server. To create bhop, surf, and jailbreak servers, you need an additional server.cfg file settings. Go to the link you need, copy server settings, and add all of this in your server.cfg file:
- CFG FOR SURF SERVER
- CFG FOR BHOP SERVER
- CFG FOR JAILBREAK SERVER
- CFG FOR ZOMBIE SERVER
- CFG FOR MINIGAMES SERVER
Srcds exe file for CS:GO server
Find exe file srcds.exe in the server folder (This file is the server startup file). Then create a text file with the .bat extension and enter the following information: start srcds.exe -game csgo -console -tickrate 128 -usercon +game_type 0 mg_bomb +map de_dust2 +game_mode 0 +mapgroup.
These are the parameters for creating a classic competitive mode with the main map de_dust 2. Instead of +map de_dust2, you can write +map de_aztec or +map de_mirage. In a word, specify the name of the map, and it will be displayed among the game maps of the server.
CS:GO server hosting
Hosting is renting a CS:GO server as a service. In exchange for a regular (usually monthly) fee, the company provides ready-made cs go game hosting with full infrastructure and all the tools. The cost of renting usually depends primarily on the number of slots (the maximum number of players you want to work with) and the tick rate (the speed of data processing by the server). A running server, after setting up, is immediately ready to receive players.
All we need is to find free hosting for our server. Here is a list of platforms that can provide free hosting and will teach you how to use it: iFreeGameServer, fshost.me, SmarterASP.
CS:GO server promotion
You can promote your server absolutely for free:
- Tell your friends about your server
- Ask your friends to make an Instagram story in which they talk about your server
- Register on a site with free server monitoring and publish your server there
- Find bloggers who will agree to advertise your server in exchange for the privileges you give them on the server
- Talk about your server in different Discord channels
- Write about your server on various forums
Summary
Creating a server is a complex task. That is easy to do for free, and the main thing is to follow the instructions. Many things may be challenging, but I hope this article will help you. Remember, your patience and hard work will get you results. I wish you good luck. We’re looking forward to your servers in the comments. Share your experience with Cyber-sport.io. Subscribe and follow the latest eSports news!


![Top 5 CS2 Cheats in [year] Top 5 CS2 Cheats in [year]](/imgs/news_8003/20241107/cache/1730975319_fad9f983f190c7d75fc0___308_174.jpg)
